
food and drink
Diet And Weight Loss To Make You Faster
Nutrition and food choices are a key component of weight loss for all endurance athletes, including cyclists. When done correctly, weight loss can have a huge
Preparation is the key and this introduction to the virtues of indoor cycling will put you in a position to succeed.
The Indoor Specialist season is upon us, and I, for one, am incredibly excited. I am also thrilled by the opportunity to share my experience and the pages of my fitness and virtual cycling blog, The Zommuique’, with the Colorado Avid Cyclist community. First, a bit about myself.
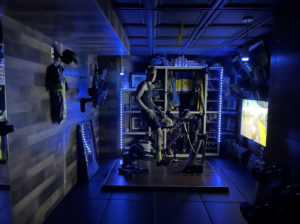
Gain Cave Video: https://youtu.be/DyEQ3OMMLeM
I’m a self-proclaimed Indoor Specialist and proud of it. Since my introduction to virtual cycling in 2019, I have ridden over 41,000 miles and climbed the vertical equivalent of 248, including a vEveresting (20,029’ of vertical gain in one continuous indoor ride). I ride, train, and race exclusively on the virtual cycling platform – Zwift. www.Zwift.com
An avid cyclist for almost three decades, I have ridden and raced extensively all over the country. I’ve never had aspirations of being more than a competitive amateur, however. I love to ride and race my bike; it’s as simply profound as that.
My passion has evolved to include virtual cycling and all the unique benefits it has to offer. I do not intend to convert you but rather open your eyes to the vibrant virtual cycling community. I’m well aware that cycling indoors is something that you, a traditional cyclist, may do more out of necessity than choice.
I will guide you where virtual cycling has taken me over the past three years through my experiential knowledge. My value to you is two-fold.
I am immersed in the virtual cycling culture and esports community and will provide a first-hand perspective. As a physical therapist with over 25 years in private practice, my insight will ensure that the transition will be a smooth one if you choose to make it.
That said, what better place to start than by assisting you in setting yourself up for virtual cycling success? In this two-part series, I will share what works best for me, starting with function.
You will learn the basics of setting up your indoor space safely and effectively. Once the essentials are in place, I will give you my blueprint for making virtual cycling fun and no longer something to dread.
There are countless options to turn your regular bike into an indoor cycling rig, and they are summed up into two categories.
Dumb trainers are simple and basic, like a magnetic or air-resistance trainer. Most models like this are termed wheel-on trainers because the rear wheel rotates on a roller that creates resistance.
To transmit information to apps like Zwift, you must use a PowerMeter because this type of trainer does not transmit data. Hence the term “dumb.” 
I consider them dumb because the lack of resistance variation produces a less realistic riding experience and is a poor choice. One that results in limited usage or a waste of money when you decide to upgrade.
Smart trainers are more complex electronic devices capable of broadcasting power and cadence via ANT+ and Bluetooth. Most trainers in this category are direct drive, meaning that you remove the rear wheel from your bike and place the chain directly on a cassette mounted to the unit.
 A smart trainer’s resistance is controlled by the indoor cycling app you are using. When the incline of the course changes, you feel the resistance change, and hills feel like hills.
There are many models to choose from with a wide range of features in several different price ranges. A description of each is beyond the scope of this introduction, but I have tried many, and this is the one that works for me.
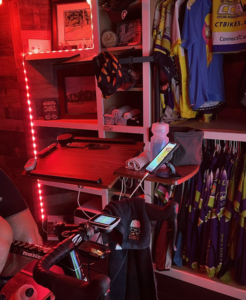
Once you have chosen a trainer, the next step is to install your bike. Be sure to find a stable surface with enough space to allow unhindered use. Place your trainer and bike on a mat to dampen vibration and decrease noise.
I use this to catch any sweat that drops – https://amzn.to/3ANB9VA
Support the front wheel with a block or other device to ensure that it doesn’t move. The one I use is sturdy and has three different heights to vary your position during climbing workouts. https://amzn.to/3vgMT1E
The bike you decide to mount to your trainer is critical. If you plan to use the same bike indoors and out, be sure to have a comfortable saddle. You tend to move less frequently when riding inside, and there are often fewer opportunities to come up out of the saddle.
If you have dedicated a second bike to indoor riding, make sure that it fits appropriately. Ideally, you want to have minimal variation between your indoor and outdoor bike setups. Eliminate as many variables as possible by using similar components and a bike of comparable geometry.
A professional bike fit is always a good idea, and your fitter will be able to provide the consistency you need. It is more convenient to have a bike that you leave on the trainer, but if it isn’t fit effectively, you will be prone to repetitive overuse injury.
A trainer and bike setup are of little use in this scenario without a device. The majority of indoor cycling apps can run on all smartphones or tablets with Bluetooth connectivity. The devices include the iPhone, iPad, Android phones, and even Apple TV.
 You can also use a computer as long as the specifications support the program you plan to use. An ANT+ dongle is recommended in most cases if your computer or app doesn’t support Bluetooth.
Just because I like and use Zwift doesn’t mean you have to. There are many options, each with its merits. The details outlining the pros, cons, and differences between each is a discussion for a different time. Until then, here is a brief description of several options:
Take the time to give each app a try. The choice you make is critical to indoor cycling enjoyment.
 Troubleshooting Trainer Connectivity and Accuracy Issues
You have found your trainer and mounted your bike perfectly. You have booted up the indoor cycling app on the device you have decided is best for you. All of your hard work is about to pay off. How exciting?
You are all set to go, but something’s not right, and you don’t know what it is. There is nothing more frustrating than the inability to ride or train because you are experiencing the virtual equivalent of a flat tire. Here are some steps you can take:
Step 1: Update your Firmware
The vast majority of trainer connectivity and accuracy issues can be solved by simple firmware updates using the manufacturer’s smartphone apps.
Step 2: Spindown and Calibration
The next thing you need to do is perform a spin-down, which is effectively a calibration of your trainer. If you are having accuracy issues, I recommend using the company’s own calibration app and following the procedure outlined because every device is different.
Step 3: Eliminate Signal Interference
If the signal transmitted by your trainer is fluctuating unexpectedly, dropping to zero, or spiking, signal interference may be to blame. Here are a few things to do.
Now that your technology domestique has you back in business, let’s move on to the finer details.
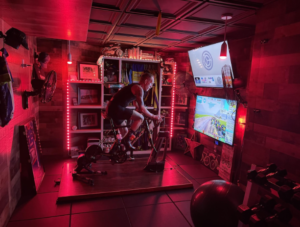
You’ve done the majority of the heavy lifting and now it is time to add the finishing touches. The following are additional items that are essential to enhance your virtual cycling experience.
Yes, safety. It’s not what you think. However, I have crashed in my basement. Imagine the look on my wife’s face when she saw me lying on the floor—clipped in to my bike while it was still mounted to the trainer.
No, I am referring to the indoor environment you have chosen for your virtual cycling setup. Did you know that asthma is the most common chronic condition in athletes? That high-intensity exercise damages the lining of our airways and is an underlying cause of asthma? More importantly, that indoor air can be more dangerous than outdoor air for an endurance athlete?
The air quality in your indoor training area is a significant concern. To many cyclists, the place they choose to plop their training rig is an afterthought. In an article I wrote for The ZOM, I detailed the potential risks, how to identify unsafe conditions, and the steps you can take to mitigate the potentially dangerous effects of poor indoor air quality.
You will find the article entitled “Poor Indoor Air Quality – The Invisible Danger to the Virtual Cyclist here.
If you don’t choose wisely, your overall health and cycling performance will suffer. You don’t believe me? I have proof. In a follow-up article to the one mentioned above, I set up a simple experiment.
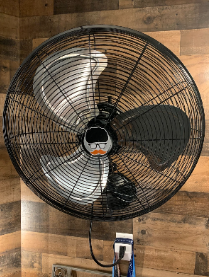
By closing the doors, turning off my air conditioning unit, and decreasing the ventilation in my indoor space, I attempted to mimic many cyclists’ conditions. I monitored the air quality while training using a home air quality detector. After riding for a short time, CO2, particulate matter, and the relative humidity and temperature rose to unsafe levels.
You can find the details of my mini-experiment in the article I posted with my results on The ZOM here.
Air Cleaner – The portable air purifier has HEPA filtration, a UVC germicidal lamp, and a toxic gas reduction system. I purchased this unit several years ago when I felt that my throat was irritated after every ride. Perhaps this was the first indication. This is the one I use. https://amzn.to/3hYJC0C
I contacted the company that manufactures the Air Quality Detector I used in my experiment and explained my experience and the concern I felt for my fellow virtual cyclists. They agreed to extend a 10% discount to The Zom readers by using the discount code Chris10 at checkout from either of their two sites: www.TemTopUS.com or www.ElitechUStore.com.
To me, Virtual Cycling IS Cycling, and I am excited to share my passion with you, the readers of the Colorado Avid Cyclist. Take the ride with me as I share my experience to enhance yours. Next up – Setting Yourself Up For Virtual Cycling Success – Making it FUN!
Are you as excited about the start of the Indoor Specialist season as I am? Has this primer on the functional aspects of setting yourself up for virtual cycling success changed your mind? Comment below! Your fellow Colorado Avid Cyclists want to know.
To subscribe to the Zommunique and receive more informative and entertaining articles like this one sent directly to your inbox, click here!
Social Blurb: By making the proper decisions you will ensure that your indoor training space is efficient and safe. Follow these simple steps to enhance your virtual cycling enjoyment and get a great work out too!
Nutrition and food choices are a key component of weight loss for all endurance athletes, including cyclists. When done correctly, weight loss can have a huge

Photos are rolling from Mt. Blue Sky/Bob Cook Memorial Hill Climb p/b Team Evergreen on that was held this past weekend. The day lived up

Pad Thai is a popular street food in Thailand, which is whipped up quickly and packed full of flavor. It’s one of our favorite post-ride

Tubless Tires: Myth or Magic? Justin Bolinger of I Know a Guy Bicycles “UNBOXES” the Truth about this setup (Should you go Tubeless?) Recent Posts

Last week, Douglas County hosted the Natural Grocers Criterium at their sheriff’s training facility, and the camera of Ryan Muncy/Ryan Muncy Photography was on the scene

When you are looking to refuel at lunchtime, go for carbs and quality protein – this pasta dish is ideal. Cycling takes energy, and energy come